OLAP Cubes

Request In-Person Cube Training

The Office of Institutional Research conducts training sessions for users to learn the functionality of pivot tables. Use the form below to request.

How to Use a Cube

Cubes are primarily accessed using Microsoft Excel PivotTables.

For more information, use this guide on connecting and using the cubes available in the data warehouse.

How to Use a Cube on a Mac OS

The Mac operating system does not support the cube technology. SQL Server Analysis Servers (SSAS), which drive the cube functionality, require Windows authentication.

Mac users can use UGA vLab to access a cube. Instructions for connecting are available here.

View the recorded DW Reporting Workshop from October 25th, 2018

View the recorded DW Reporting Workshop from October 25th

Tableau Reports

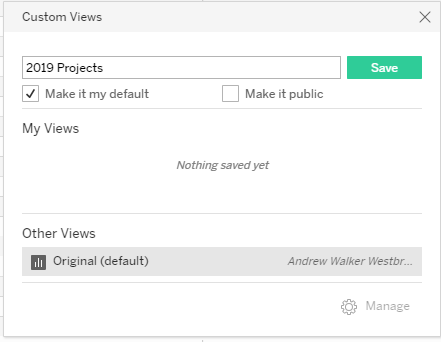
How to Create a Custom View
  1. Open the individual view (sheet) that you want to customize.
  2. Filter the data, change sorting, or make any other modifications.

    Note: In the toolbar, the View option will include an asterisk, indicating that the view has changed.

  3. Click View in the toolbar.
  4. Enter a name for the custom view. Then, select whether you want it to be the default view you see.

  5. Click Save.
  6. You can create and save multiple views for each sheet within a workbook.
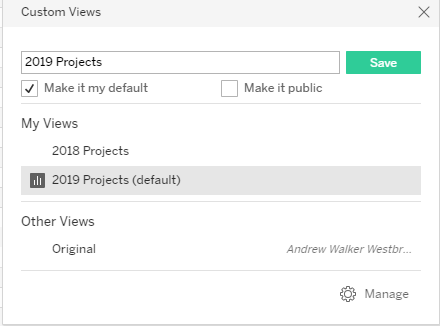
Choosing a Different Custom View
  1. Click View in the toolbar. The currently selected view appears with a gray background.
  2. Click another view to display that view.

    Custom views that you have saved appear under My Views, and the original view appears under Other Views.

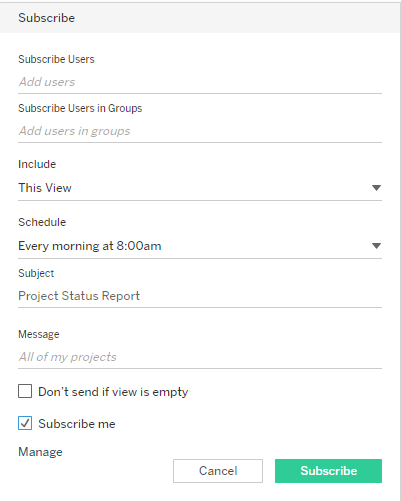
How to Subscribe to Views

For most reports, you will want to create a custom view before subscribing.

When you subcribe to a view, the subscription will send an email to the address you enter with a snapshot of the view at regular intervals without requiring you to sign in.

  1. Open the view to which you want to subscribe.
  2. In the toolbar above the view, click Subscribe.

  3. Add the Tableau users you want to receive the subscription.

    Note: Users must have permission to view the content in order to receive the subscription.

  4. Choose whether the subscription emails include the current view or the entire workbook.
  5. Pick a schedule option:
    1. Every morning at 8:00 am
    2. First day of the month
    3. Monday morning at 8:00 am
    4. Weekday morning
    5. Weekend mornings at 8:00 am
  6. to clarify subscription emails, customize the subject line and add a message.
  7. Select Subscribe me if you wish to receive the emails.
  8. Click Subscribe.

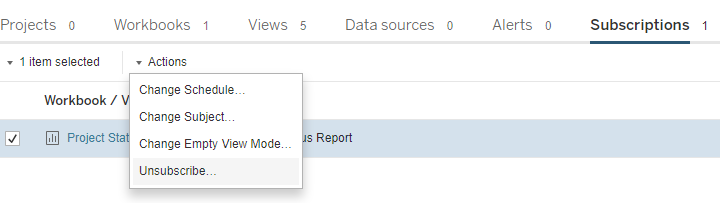
How to Unsubscribe from a View
  1. Access your Tableau Server account settings by doing one of the following:
    1. Click Manage my subscriptions at the bottom of a subscription email.
    2. Sign in to Tableau Server. At the top of the page, select your name, and then select My Content.

  2. Click Subscriptions.
  3. Select the check box next tot he view you want to unsubscribe from, click Actions, and then click Unsubscribe.

How to Drilldown in a Report

Some reports may have additional detail available that is not seen in the initial view. Not all reports will have this functionality.

  1. If more detail is available, you can hover over the header and click on the [+] sign to drill down to more granular detail. Note that the [+] will only appear while hovering over the header with your mouse.

  2.  

  3. Some reports may have multiple levels of granularity available.

  4.  

  5. Some reports may have additional detail available in the columns as well as the rows.

  6.  

  7. Click Undo in the toolbar to move back one level, or click Revert to return to the default on the report.